This blog post is not for graphic designers — it’s for the rest of us who simply want to use images to clarify or amplify our message, or to better engage our readers. But before we dig into one of the least-known HubSpot tools, let’s talk image sizes for a minute.
File Size vs. Image Size and why this matters
It’s important to understand the difference between file size and image size, as this will directly impact how fast your pages load.
File Size refers to the number of bytes (storage space) required to save a file to a disk. This is usually expressed in megabytes (Mb) in your camera or phone, and kilobytes (Kb) for web images.
Image Size refers to the dimensions of an image, i.e. the image’s height and width.
You probably know that as of April 20, 2015, Google is penalizing sites that are not mobile-friendly. So imagine this scenario. . .
You find the perfect image on Flickr, and it’s available for commercial use, so you download it and add it to HubSpot’s File Manager for use in your latest blog post. In the blog post you scale it down so it’s the right size visually and click Save. Now you’re good to publish, right?
Then I come to visit your website on my Android phone, and . . . and . . . why is it taking so long to download the page?!!!!
While your image size was visually small, the file size was huge and the website is loading that humongisized image and re-sizing it to fit on my little screen. But my device still has to load the entire big image.
So HubSpot’s Image Editor lets you clone that big honking photo you love, and then resize it (changing the file size) and save it as a new, smaller image. This smaller image is much more suitable for use on your blog or website, and will be appreciated by all your users (desktop and mobile) since it will decrease your page loading time.
With that out of the way, let’s dig into HubSpot’s least-known tool, the Image Editor.
Optimizing your images for the web
The HubSpot Image Editor now makes it easy to edit and resize images for your pages, blog posts, and social posts right from within the content editor, File Manager, or Social Publisher. Some useful applications of the photo editor include:
- Reducing the dimensions and file size of images to decrease page load times and ensure the proper max-width of images.
- Cropping images to better fit in with your content.
- Adding text, stickers, and drawings to images to help explain or highlight areas of an image.
- Adjusting brightness, and contrast of a photo to ensure image clarity.
- Images on HubSpot’s responsive pages or emails will scale up until their natural size; therefore, you generally will not need an image to be wider than the main content on your page (generally 980px-1280px) or email (generally 600px). One exception where you would potentially want a larger high-res image, is when using large background images.
- Reducing the dimensions and file size of an image can help prevent emails from getting caught in spam filters (as well as including more text in the email).
- Adding alt text or descriptions to your images can help search engines and screen readers interpret your images and understand their content. Use relevant targeted keywords identified with the Keywords tool for the alt text to improve your content’s SEO.
- Once the image is an appropriate natural size, you can tweak the size further within HubSpot’s WYSIWYG content editor.
Getting started – clone your image
Open the File Manager to find the image you want, or upload your image. Then click the little down arrow on the right and click on Clone & Edit. The image must be saved as a JPG or PNG to be editable with HubSpot’s photo editor. If you do not see an option to Clone & Edit, please ensure that the image is saved as the correct file type with the correct extension (.jpg or .png).
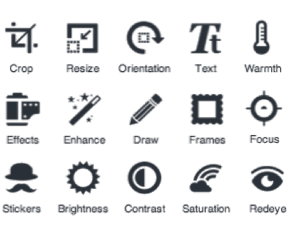
The photo editor has several advanced photo editing functions that can be used individually or in conjunction (the links go to the Image Editor User Guide on HubSpot):
Add the image to your page and make final adjustments
After clicking Save, choose your cloned image and select Use Image to insert it into your content.
Once the image has been added to your content editor, you can edit the HTML dimensions and spacing, by clicking on the image.
To add alt text, click Edit image… and enter your description into the Alt Text (description) field.
Use HubSpot’s built-in tools to increase your efficiency
We used to need a desktop editing tool to resize and tweak our images – no more! The Image Editor has all the power we need for most web images.
HubSpot has lots of tools, many of which are underutilized. We’ve written about the SEO Suggestions tool, but did you know that there is a tool that let’s you view your page/post in mobile format? Subscribe to our blog for more about HubSpot’s hidden tools and best practices.
